Showing posts with label chalk pastels. Show all posts

Monday, October 7, 2013

Hand dyed paper with chalk pastel solar systems - grade 6


In grade six, we are currently learning about the solar system. Doing science integrated art lessons is so much fun, and I especially enjoy doing projects with outer space themes (see here and  here.)

A while back I learned a great technique for dying paper with chalk pastels, which I have used for my silhouette project, as well as the following year for my spooky silhouettes. I've only ever tried it on white paper, but thought that if it would work on black cardstock, it could make the perfect background for an outer space portrait. Luckily, it worked so well!

I've outlined the steps to dying the paper again, as there are a few things I've learned since the first time I posted about it.

Here's what you need to know to hand dye paper (definitely works with white paper, and black cardstock)

Step 1: Fill a basin with water, about 2 inches deep. Using a pair of scissors (adult) or a popsicle stick (student) scrape off shavings from a piece of chalk, or a piece of chalk pastel, into the basin. 

Note: When I first began doing this project, I would let students shave the chalk themselves. Just for times sake, though, I have started doing this process with them. They come sit with me and tell me what colors to do in what order, and I scrape it into the basin. It speeds everything up so much!

Step 2: Keep going until your water is VERY speckly on top of the water. Make sure that you don't agitate the basin, or all of the flecks will sink to the bottom.

Step 3. Submerge your paper facedown into the basin, for about 5-7 seconds. Make sure to lightly tap all around the paper so that it covers all parts of the paper. Quickly lift your paper up in one motion, and lay it face up to dry (I put them on placemats to dry, as they're soaked!)

Step 4: If you have any white spots left, scrape some more chalk onto the blank spots to cover them up. The paper should dry quickly (in our case, within about 30 minutes.) 

While the paper was drying, students drew their planets onto white paper, and colored them using a combination of chalk and chalk pastels. We did a lesson on identifying the light source, and talked about how shading could make the planets look three dimensional. I let them invent their own planets, so they didn't have to worry about accuracy of shapes and colors.

Once their paper was dry, they glued their planets on, making sure that the light source always came from the same place. They were able to finish this in 2 fifty minute periods.


I hope I accurately portrayed how beautiful these are! Taking pictures of black background is never easy, especially since my camera made these come out a little bit chalkier than they are in person. They're so pretty!

Sunday, March 3, 2013

Eye study - grade 5/6


I am trying to do more complex drawing activities with my older students. I mostly avoid them, because I am so terrible at drawing myself, but I definitely value the importance of learning to see proportion, and drawing from observation.

For this project, students simply used a mirror, and drew what they saw. We talked a lot before they began, about the proportions of an eye, and how to draw them. They looked at printouts showing how to draw an eye. They even did a run through using just pencil on computer paper.

For the actual drawing, students worked with pencil on drawing paper, doing everything but the eyelashes and eyebrows. Then, they used drawing pastels and charcoals to outline their eyes, and add the hair details. Finally, they used chalk pastels to give them color. I think they are just beautiful! I really wish I had more that I could show, but I always have a lot of trouble getting pictures of projects on white paper. It's completely the fault of my photography skills, it's not for lack of beautiful examples!


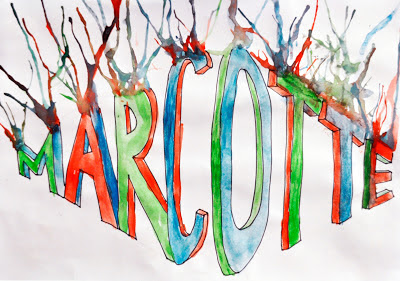
When students were finished we still had a lot of time, so I showed them how to do words in two point perspective. I find this so hard! I actually had to have a student do my lettering for me, as I find the 3d part just brain meltingly confusing. I did an exploding letter technique on my letters, and if I ever did this project as a full on class, not just as an extra, I would definitely have students color it in this way! (I'll be posting a project I did using this technique later this week.)


Who else has Spring break coming up? Ours is in one week!

Thursday, February 7, 2013

Positive/Negative hearts 1/2


This is an easy, beautiful lesson that I originally saw on artsonia and decided to do with my grade 1/2 classes. I needed something that could be done in only one class, as I won't be seeing some of them again before Valentine's day.

We started off by talking about positive and negative space, and I showed them examples of the hearts that I had cut out (they'll be using these to do the project.) Students were each told that they'd be getting one positive heart shape, and one negative heart shape. This is how they'll use them:


They began by placing the positive heart on the piece of paper, and tracing all around it using chalk pastel. Then, they used a kleenex to pull the color away from the heart, creating a negative imagine of a heart on their page. They did this several times, until they had covered the paper with pastel and white hearts.

Next, they took the negative heart shape, and traced it on the paper, over their other hearts. This time, they pulled the chalk pastel inwards, creating a positive heart shape. They added as many as they wanted to, until they felt their project was finished. They looked beautiful, and were easily finished in one period. Such a great Valentine's project!


Sunday, January 6, 2013

Shaded Christmas balls - grade 5/6

This is a project that was born out of necessity. The Friday before Christmas break ended up being.. wait for it.. another snow day! If you're keeping track, that makes THREE snow days in a period of two weeks. Sometimes when attendance is low, we'll pool classes together to give teachers extra planning time. My colleague offered to take the classes to the gym, after which I would take the classes for an art lesson. While they were in the gym, I desperately searched for a quick, Christmas-y related project that I could do with the supplies I already had, in about 40 minutes.  I unfortunately don't even remember where I came across this idea - it was basically a similar picture and I just copied what I thought was going on! If this idea belongs to you, please let me know so I can credit you!

Anyway, this project was as simple as it seems - students drew branches using chalk pastels onto black paper. Then, they drew Christmas balls on white construction paper using oil pastels. They cut out the Christmas balls and glued them to the black paper. The last step was to use gold Sharpie to draw little hooks. A very quick, very satisfying 40 minute project for a group of snowed-in students!

(Before you get to the photos, I'll add - they don't do this art justice! I had to take quick pictures with my iPhone, as the kids were taking these home for Christmas break.)


Tuesday, December 11, 2012

Watercolor Marker/Chalk Pastel Scarecrows - grade 3/4

This must be an indication of how busy I was during the move - these projects are from early October! I just found these photos while clearing out my camera, and they were too cute not to share.We did a group draw to make the basic form of the scarecrow, then they were free to add details, change anything they wanted, etc. They drew first in pencil, then traced in Sharpie.

The next week, they began coloring in their scarecrows using the watercolor marker technique, which I explained in a bit more detail here. I'm such a fan of this technique! When they were finished coloring the scarecrows, they used chalk pastels to make swirly, sunset-y backgrounds for their pictures. LOVE these!!


Surprisingly, I have a few more projects I never posted -I'll get them up soon!!

While you're here, don't forget to please vote for me for Art Ed Blog of the Year, which you can do by clicking this link and voting for Artisan Des Arts! Thanks so much, guys!!

Thursday, December 6, 2012

Blended gradiant snowmen - grade 3


Snowmen make for fantastic drawing projects, because they're relatively easy for children to draw, and they lend themselves really well to gradient blending. I originally did a project similar to this last year with grade 5/6, but I decided to give it a try with grade 3 this year, and I'm really pleased with the results!!

I began by giving students a demonstration of how to blend using chalk pastels:


It took them 2 periods of about 40 minutes to finish, although some finished much quicker. They're so proud of how real their snowmen look!


Only two more weeks until Winter break!

Sunday, October 28, 2012

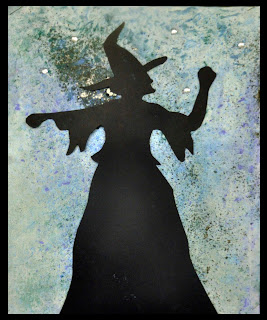
Spooky silhouettes on hand dyed paper - grade 5/6


This is a project I did last year that has actually become one of my most popular projects on this blog. I figured I would do it again towards the end of the year, as I did last year, but then I had the idea of using the same technique but with spooky Halloween silhouettes.

I gave my students about 20 minutes in the computer lab, where they had to compile together their ideas for their silhouette. Once we got back to class, they drew their ideas onto black paper. The one rule here was that they could not trace what they found online - even if they found the perfect image ready to go, they still had to draw it, rather than tracing it.

We used the exact same technique as last time to dye the paper, which I outlined in my last post. The only difference is that this time, they added sparkles after chalk pastel, to look like twinkly stars in the sky. These don't show up too much in the pictures, but they look great in person! After about an hour and a half, the papers were dry enough to glue the silhouettes onto. Then we mounted them onto black paper, and they were done!

Let me know if you try this technique and if you have any luck with it. We love it over in my class!


Related Posts Plugin for WordPress, Blogger...