Showing posts with label watercolor paint. Show all posts

Friday, March 8, 2013

Scream! - grade 3/4


About a week ago, I found this project on Pinterest and was so inspired that I decided to do it the next day with my grade 3/4 class.

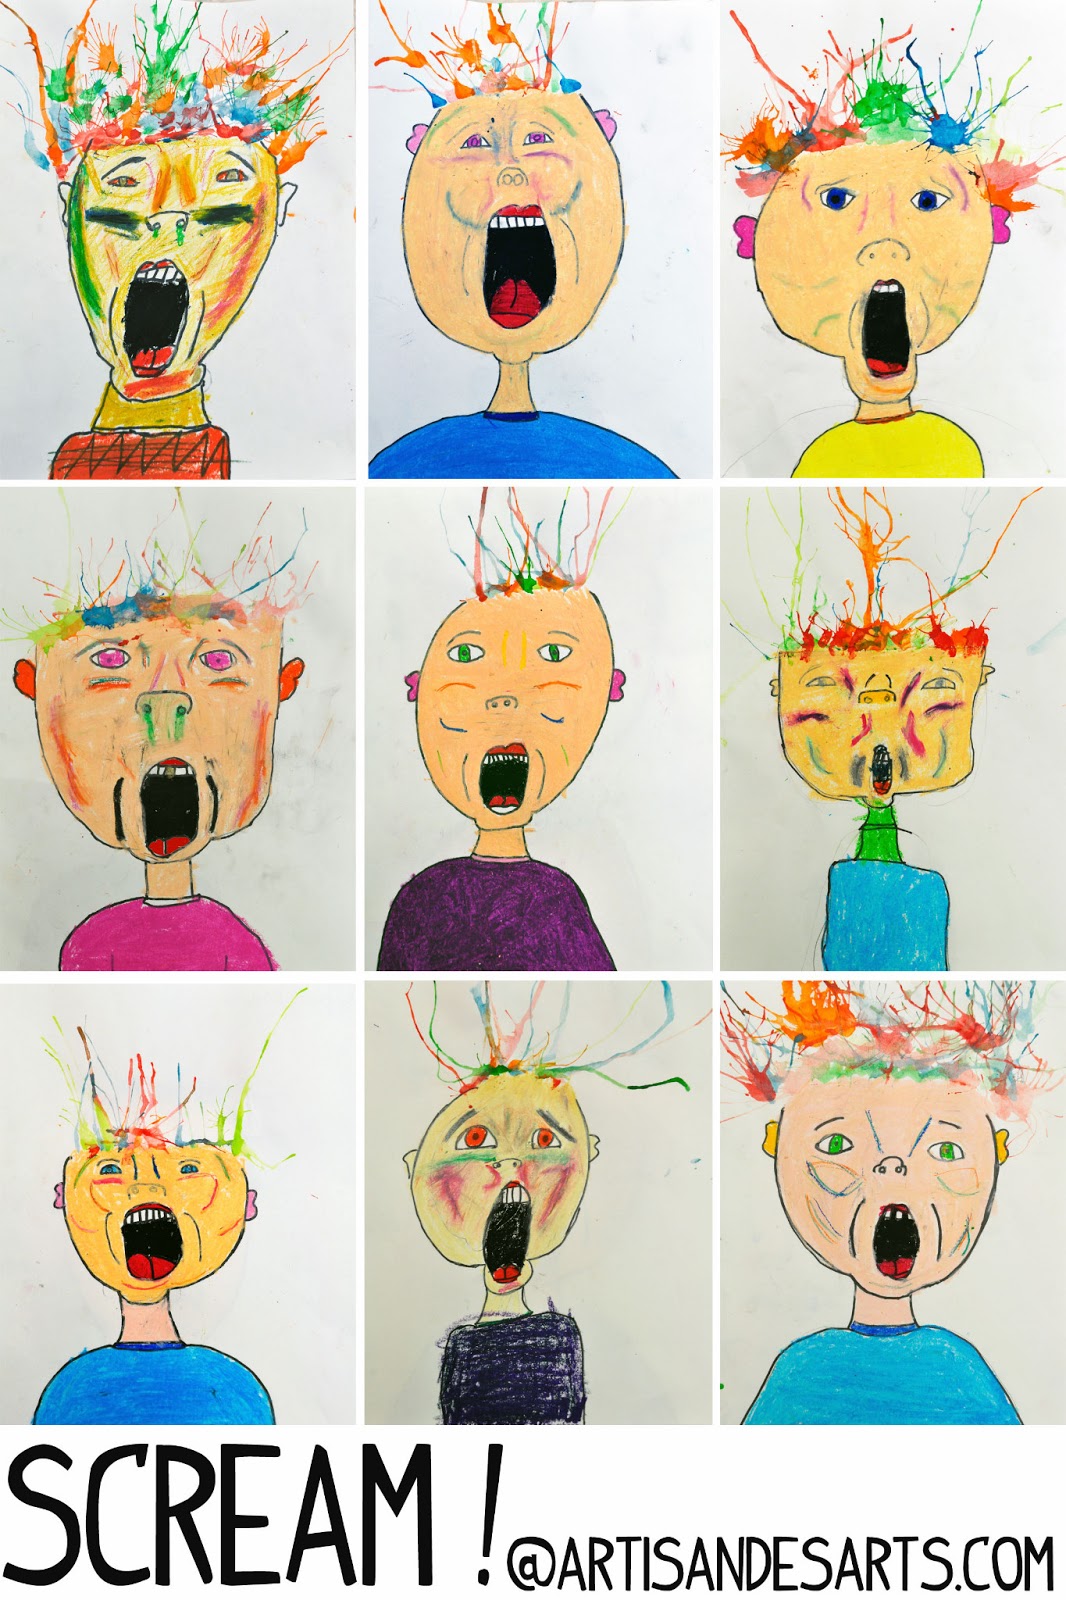
The idea for this art project was to do a quirky portrait using pastels, with a focus on shading the face using unusual colors (such as pinks, oranges, greens.) Students would make their person look frightened by blowing watercolor paint with a straw to make the hair appear as though it were standing on end.

When the class came in, I had my example up on the board. Immediate, the boys started cheering "EXPLODING BRAINS!!" and it caught on like wildfire. There was nothing I could do to stop it. I kept repeating, "It's NOT exploding brains. The person is SCARED and his HAIR is standing up!" My students would reply, "Ya, and then his BRAINS EXPLODED!!"

This worried me. I certainly don't want to send students home saying "look at the exploding brains we did with our art teacher!" Not really the impression I want to give parents. But on the other hand, I can't exactly tell students not to interpret art how they want to. They were totally excited about this project, the boys more so than I've ever seen them. But they weren't seeing the drawing how I wanted them to see it.

I wasn't prepared to just abandon the project, especially since I thought it was a great lesson in portrait drawing, and I was excited to see their finished projects. I finally decided that they could view this project however they wanted, but they must remember that my intentions were crazy hair. 

By the end of the class, we had it down:

Me: What are we working on today?
Kids: ...crazy hair...
Me: What do you THINK we're working on, in your HEAD?
Kids: EXPLODING BRAINS!!
Me: But what is it that we're working on??
Kids: Crazy hair.

In the end, I think the results are stunning, hair or brains or however you choose to see it. It's hard to relinquish that control and let students see their art how they want to, no matter how in counteracts my original plans.

If you're curious about the process, students spent the first class period drawing their portrait. They traced it in Sharpie, then colored it in in oil pastels. We talked a lot about the facial shading, about where the lines would typically be found on the face, and how to blend them into their face color. I encouraged students to pick crazy colors, not worrying about their picture looking "realistic."

During the second class, students finished up coloring with pastels, then used straws and paint to make the hair. I used acrylic pucks in single pallets, so that we could add a bunch of water. Students then scooped from the watery sides using a paintbrush, and dropped it onto their drawing.
 

The funniest thing about this picture is that this student is blatantly wearing a hat and I didn't even notice! I'm just the worst with that. My husband wears a hat all the time and I am just so used to them that they barely even register for me anymore. (I also find this boy's hat super cute!)

What do you guys think of this project? How do you interpret it - brains, or hair?


Monday, February 25, 2013

Mixed media elephants and Hot Air Balloons - grade 5/6

 Probably every three months, I decide on a new "favorite ever" art project. This one is definitely my favorite ever as of right now!

I came up with this project based on the art of Juri Romanov, a fantastic artist I came across on Etsy. A lot of the art I do with my students is very happy and colorful, and this time, I wanted to try something different. We looked at some of Romanov's art on my iPad, and talked about how these kinds of colors evoke different emotions - sadness, loneliness, solitude. Very different than the kind of emotions we normally go for!

On watercolor paper, students began by drawing their design using pencil. Some of them stuck close to Romanov's inspiration, and others strayed and went their own way. Next, they carefully traced the basic outlines using Sharpie. Students then used a paintbrush and watered down brown or grey paint to stipple their backgrounds. The stippling gave a milky, cloudy look to the paper, which worked perfectly for this kind of design.

Once the paper had dried (maybe ten or so minutes later) students began to color in their detail using pencil crayon. I had originally tried marker for my example, but it didn't get into the grooves of the watercolor paper well enough, so pencil crayon it was!

Students then added in their newsprint details. They used old dictionaries to draw elephants, mountain peaks, and clouds. Once they had glued them in, they went back to their drawing with a fine Sharpie and added any final details - lines on their balloon, swirls in their clouds, or anything else that was missing.

These projects are beautiful. Like, I am lusting after many of them for my living room walls. They are so me, which luckily ended up being something my students loved as well. There was a lot of pride flowing around the classroom after this project, and it was truly one of those days where I felt so, so lucky to get to teach art, even if it's just for part of my days. I went home feeling very inspired.


 The one below reminded me of Iceland - it's just those perfect, grey colors, and I love the single house. So desolate!


 The one below had me laughing - I love the fallen elephant. Such amazing attention to detail!


Tuesday, January 29, 2013

Grade 5/6 Hand Study

This is a beautiful project based on this hand, originally painted by notkaychan on deviantart.
This painting is just stunning, and immediately got me excited. I love the idea of drawing hands because, while it's so difficult to do, it's great to practice drawing something that you can look at and manipulate and touch and feel.

We did a practice run the day before, drawing our hands from sight (but lightly tracing them first to make sure the dimensions were accurate.)  They changed features that didn't seem right, adding bends and curves where they were required. Then, they studied the lines in their hands, picking out only the important, thick lines to include in their hand (too many details didn't seem to do them well.)

When we did the real project, they followed the same process, only this time, we used nice watercolor paper. Once they had drawn them in pencil, they used a thin Sharpie to trace the lines. To paint, students used watercolors, focusing on analogous colors, and BLENDING as much as they could. This was the real challenge of the whole project - students spend over an hour meticulously painting these hands, trying so hard to get the blending just right so that it seemed as though one color washed into the next.

The results are stunning. This was a tough project, and they did well. I am really proud of them!


Every class has the student whose mind is just to creative to control - mine came up with this monster hand below, and honestly, when I do this project again, I will definitely take it in that direction!You have to love the student who is more creative than the teacher!

Friday, November 23, 2012

Wobbly word art - grade 5/6


Oh these are cute! I've seen these wobbly word projects all over pinterest, but wasn't that interested in them until this one turned up on my friends list last week. I loved it, but made a few changes to work with  my students "style". I know from experience that they LOVE filling in shapes with doodles, so I made sure that I added that element to the project.

I made these projects totally self indulgent - they just got to choose words that represented things that they love, or things that defined them. They started off making a bank of words that they could use, an then chose the words as they fit into the spaces. Below is my example that I showed them (can you tell I love Boston!?) and their work follows. Amazing!


What do you guys think of the doodles - great addition or distracting?

Friday, April 20, 2012

Watermelon smiles- grade 2/3


   Can you tell by looking at this project how badly I want it to be summer?? This is a cute project I found here. There were no instructions, but it was pretty simple to figure out. this is a great lesson for primary grades, because it shows them a lot about layering. not only do you have the hands on top of the watermelon on top of the face, you also only have 4 fingers showing, because the thumb is behind the watermelon. 

We did this project in only one hour, including painting. I love them! (as I always seem to!)


Just a side note - I am at 98 followers! Only two more until 100. When I started, that number seemed so unattainable. Now I am almost there!

Tuesday, April 17, 2012

Kindergarten lizards!

Oh boy. Kindergarten (and younger grades in general) have never been my strong point, so teaching art from K-6 this year has been a huge stretch. It makes me so happy when I do a lesson with a younger group that just goes so well. These lizards are really just the cutest things I think I've ever seen. They look so weepy and sleepy, and I just love them. I found the idea here.

On the first day, they drew the lizards, then painted them in using watercolor paint. On the second day, they cut them out, then decorated a backing paper. When they were finished coloring, they glued the lizard to the background. A very simple yet adorable lesson!


Ps. My favorite chameleon video of all time is this one. I laugh every time!

Saturday, April 14, 2012

Titanic paintings - grade 2

I really wanted to come up with a lesson related to the Titanic, because it is quite relevant right now. With the anniversary of the ships voyage, and the films re-release, students probably have more knowledge about the Titanic now than in previous years.

I attempted this lesson with grade 2's, and it went perfectly. We finished it in well under an hour, everything from drawing to painting to making the chalk sky (using a technique for the clouds that I found at Smart Class).

Materials used:
Sharpie
Chalk pastel (sky, smoke coming from chimneys)
Liquid watercolor (red, black)
Tempera pucks (yellow, blue)
Metallic gold paint (windows on boat)

Here's a photo how-to for these simple Titanic boats!


Below, some photos of my students working on them, and some of their finished results!


Related Posts Plugin for WordPress, Blogger...