Showing posts with label markers. Show all posts

Sunday, November 3, 2013

Stacked Square Optical Illusion - grade 6

This is a project I absolutely love - it always produces great results, it's fairly simple for students to follow, and it's a great lesson for shading and creating a 3D drawing!

I'm not sure what to call this illusion - I've seen it a few times, but there's never really been a name associated with it. to me it looks like stacked squares... soo.. stacked square illusion?


Here's how to do the stacked square illusion:

                       
I begin by giving my students a template that I've made with three lines, as you can see in the first picture. I like to give them a starting point, because students can get really caught up in drawing the lines straight or the perfect dimensions apart. Instead of having them use the side with the lines, I have them work from the backside of the paper, so they can faintly see the three lines through the paper, but they aren't actually a part of their final project. (I hope this makes sense.)

The first thing students do is connect the lines at the top and the bottom of the pate, and identify roughly where they thing the center of the shape is.

The next thing they do is start drawing pairs of lines. If the pairs are above the center mark they drew, they point them upwards (if possible, I have them point the lines more gradually upwards as they go.) The other thing they must do is close the sides of their pairs of lines (since they're working from the backside of the paper, they won't actually have the three dark black lines that we began with, they'll just be seeing them from the other side of the sheet.)

This is what they should have once they've worked up one side of the paper. Once they're at this point, they can flip their paper upside down, and do the same thing on the other side.

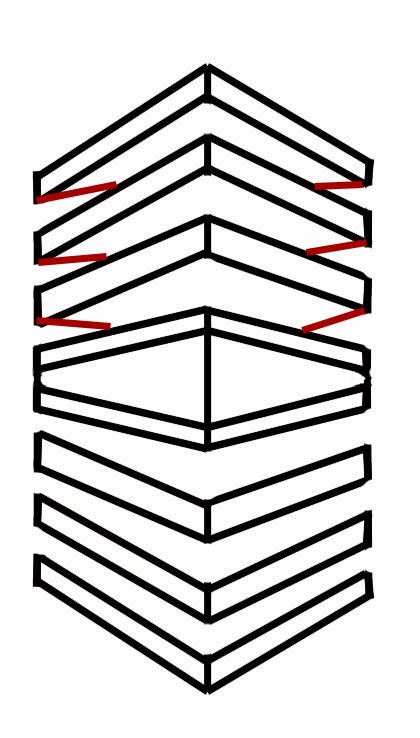
This is the part that really makes the illusion stand out - under each set of two lines, they draw two nearly horizontal lines going towards the center of the shape. They must do it all for one side of the paper, then flip it upside down and do it for the other side.

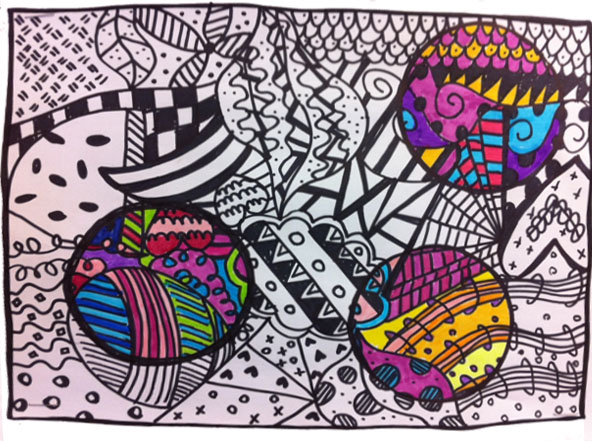
Once this is all done, they can begin to color! They need to choose a side that will be dark, and a side that will be light. To keep it simple, I have them pick a marker and a pencil crayon in the same color. The parts in between the colored sections is shaded in using a pencil - dark shading on the dark side, and lighter shading on the light side.

Once they've finished the illusion, I have them color in the background using Sharpie. They all turned out so, so well - I'd love to post them all!


Tuesday, February 12, 2013

Raining letters name art - grade 5/6

This is one of my favorite projects, that I first did two years ago, after seeing it here. It's a pretty simple project to do - students use the letters in their name to make it look like the letters are falling from th e sky and raining down. They must make sure that their letters all touch, not leaving any gaping holes on the side (this is important for when they are cutting out later.) Then, they fill in the spaces around their letters with lines and dots, using Sharpie. Finally, they color the letters using markers, using the same color for each letter. Once they are finished coloring, they cut out their entire name shape, and glue it onto a pretty background paper.

The results are always so striking. Definitely one of my favorite projects ever!


Perfect colors on the one above! Totally my style.


Love the monster king sitting on top of his name pile!


Tuesday, January 8, 2013

Heritage self portraits - grade 2

This project, if you can believe it, is from LAST APRIL! I had completely forgotten about it until I was going through old pictures on my iPhone. I chose to do this project because the grade 2 class was studying different countries, and each student was doing a project on a country of their choice (most of which related to their heritage.) I decided that instead of doing the standard cartoony-self portraits that I had planned on doing with them, we would up the ante a little bit by coloring their faces using the colors and design of their country of choice's flag.  I made the example below using Iceland (I have no ties to that country, except I had just returned from my trip there the week before we began this project.)
Here are some of the finished projects! I'll be honest, I really can't remember what countries these flags represent.


They're cute, right? They were a nice tie-in with their country projects. Can't believe I forgot about these until now!

Monday, May 7, 2012

Giraffe's Can't Dance - grade 2


This is a great lesson that I found at Deep Space Sparkle. I did this with grade 2's, and it took us two periods of an hour to finish.

Day one: Students drew the giraffes. I gave them techniques for how to do different movements with the giraffe. They then colored them in marker, and cut them out. Most were able to finish this entire step within the first hour.

Day two: On the second day, students painted the background using tempera paints. They added a silver moon, and some chose to add sparkles. They then glued the giraffes to the paper. A super easy and adorable lesson!

Monday, February 6, 2012

Black and white/colored doodles - grade 5/6

This is a quick and cute project that I came across on Art Sub Lessons (a website that I LOVE!) We've had several snow days this year, and it's always hard to come up with something that I can do with the few kids who are there.

Students could basically do whatever doodles they wanted, they just had to FILL the page. When they were finished working in Sharpie, they took styrofoam cups and traced 3 (or more) circles. Anything that fell within the circle was colored in. SO simple, and as the above website states, perfect for a supply teacher!


Saturday, February 4, 2012

Matryoshka/Russian nesting dolls - grade 2/3


I saw this amazing idea for Matryoshka dolls on Deep Space Sparkle, and just had to try it with my grade2/3’s. This project required a fair amount of preparation – I prepared 20 tracers each of a small, medium, and large sized doll (my lovely sixth graders cut them out for me.) I spent a lot of time teaching the 2/3 graders how to trace the dolls so that one was in front of the two others.
 They traced in Sharpie, so there wasn’t any room for erasing! Luckily, they ALL managed to get those dolls on their pages, which meant we could move onto the fun stuff – drawing the patterns inside.
We looked at pictures of Matryoshka dolls and talked about the patterns inside – how you wouldn’t see a house or a face in the pattern;I encouraged them to use flowing lines, flowers, hearts, simple shapes, etc. They coloured the doll entirely in marker, except the face, which was done with pencil crayon. They painted their backgrounds using cool colored liquid watercolor paint (Which. I. Love.) and then glued their dolls on top.They were SO proud, and I must say, I adore how these turned out!

Wednesday, January 18, 2012

Name kaleidoscope art - Grade 4/5/6

Here's a great lesson that I saw over on  teach kids art. It's quite simple, very relaxing, and would be great to leave with a supply teacher (I left explicit directions below, which could be printed up and handed to a supply!) I love how my kids did with this one! It took probably 2 hour long periods.
  
Here's the step by step. Use an 8 1/2 x 11 paper, and fold it into a square:


 Each kid will need one of these folded papers for themselves as well (do the same thing as the first two steps)
 Using the triangles from earlier, they will make their tracers:
Then,decide what letter will be in the middle, and trace the name (use pencil first) flipping the triangle over as you go to make sure the same letter is in the center.
Then, color it all in!


Related Posts Plugin for WordPress, Blogger...