Showing posts with label Social studies. Show all posts

Friday, January 10, 2014

Splatter negative space maps - grade 6, geography/social studies link


This week, I began studying geography with my sixth graders. We began by reviewing the world's continents and oceans, and I wanted to do an art project that could help consolidate our learning. I love projects that utilize negative space, so I thought it would be really fun if students did negative space maps of the world!

I began by printing copies of this map for each student onto 11x17 paper.

The first thing they had to do was cut out  their map pieces and tape them down to a sheet of white paper. They used two to three balls of masking tape per section of map.


My favorite part about the cutting was the geography language they were using - as they were working, they were saying things like "which direction does Australia go?" "Should South America be touching North America?" "How far away should Europe and Africa be from North and South America?" For a group of students who were using an atlas at the beginning of the week to label a map of continents, it was SO neat to see them using what they had learned and putting it into practice!

I told them not to worry about little islands or details, because they were so small that taping them down with a ball of tape would be nearly impossible. I just encouraged them to use their best judgement as to what to include.

Here's what the maps looked like after they had taped them down (watch out for Greenland!)


Once they've taped down their pieces of continent, they can start stippling. We used tempera pucks to paint. Students held down their continents with their fingers, so that paint wouldn't leak underneath their map pieces.


The stippling takes about 15-20 minutes. It's really important that students not worry about perfection. The thicker the lines and the more variety in paint color, the neater it will look. I kept reminding my students to make it look like an explosion of paint!


After they've stippled all around the continents, they can add additional paint markings, and splatter all over the entire map.


Once the paint has dried (usually in the about of time it takes them to clean their brush and wash their desk) they can remove the paper cutouts of their continents, and enjoy their beautiful art!


So beautiful, right? I love social studies related art!

Wednesday, November 20, 2013

European explorer art - Grade 6 Social studies link (Ontario)

This is a project that I'm revisiting from a few years ago (initially posted here.) One of our curriculum goals in sixth grade social studies is to have students explore technological advances that helped with exploration. As a class we studied the compass, sextant, hourglass, and astrolabe, and then students did additional research about the technology of their choice.

Using pencil, they drew their object onto drawing paper, then used a variety of metallic paints (gold, bronze, silver) and watercolor to paint in their drawings. Once they were finished, they chose a map from an old atlas I had in my class, and took their maps home to burn them. I am beyond impressed with their quality of work!


Tuesday, October 15, 2013

Aboriginal/Native American inspired art - grade 6, social studies link


Since we've been studying Canada's first nations in social studies, I wanted to do an art project based on aboriginal art. I did a lot of research on different types of art from different times through history, and came across the website Urban Aboriginal, a site that showcases aboriginal artists in the Vancouver area. I pretty quickly fell in love with the art, and when I showed it to my students, they were so excited to have a chance to work within that style.

We did a lesson on aboriginal art features - colors used, style, and meaning of the animals. We also talked about the balance that the artists create in their drawings, keeping in mind space around the drawing, and space between shapes within their drawings. Students were then given a thirty minute period to research artists on Urban Aboriginal. They were allowed to print photos as reference, but couldn't actually copy the photos.

They drew first in pencil, then traced in Sharpie (thick or thin, depending on the style they were going for.) Then, they used carefully selected markers to color in their drawings, keeping in mind to maintain a balance between color, black and white.

There's a lot of complexities in this project, and I just can't say how impressed I am with how they turned out!


Wednesday, May 1, 2013

Egpytian glue portraits


Sorry for the absence! I've been sick for the better part of the past week, and with that came a pounding headache and light sensitivity. The last thing I wanted to do was spend time editing photos for my blog! I have so many projects to get to, though.

Here's a fun project I did with my grade 5's.They are currently studying ancient Egypt, and I wanted to do a portrait study with them.

Students used a computer period to do a study of ancient Egyptian profile portraits. They sketched out an idea that they were happy with, and then we did a guided draw of the facial details once we were back in class.

Once students had finished their drawing (in pencil), they used glue to outline their drawings. The next day, they used chalk pastels to fill them in. The finishing touch was a few jewels, which they glued on as accessories. They're beautiful!!


Sunday, March 24, 2013

Canvas Tipis - grade 6


For the past two years, my homeroom class has been a grade 5/6 class. That means a lot of my grade 6's this year were actually my grade 5's last year. I did this project last year with the grade 6's, and this year, the new grade 6's were so excited to get their chance to do it!

Part of our social studies curriculum for grade six is First Nations Peoples and European Explorers, which is pretty much the best unit possible for art projects. Our first big project, after studying First Nation's habitats, was to make tipis.

I have a go-to tipi template, which can be found here. Students each get a copy of a tipi template, and then we spend some time in the computer lab, where they research First Nations symbols. Students are given about a hour to draw out their plans, focusing on symmetry, placement of symbols and color choice.

Once they have finished their rough draft, they are given piece of thick canvas material (I bought this canvas at an estate sale for probably under a dollar, and it was enough material for two years of tipis!) They tape their paper tipi template to their canvas, and cut it out.

Students then used Sharpie and acrylic paint to recreate their designs onto the canvas. Black Sharpie is used to make the base of their designs, then colored Sharpies are used for the small details. Larger details are filled in using acrylic paint. The paint thickens up the canvas, making it really sturdy - perfect for their tipis!

I had a donation of old binders, which I cut apart and we used for the base of their tipis. On top of the binder, students built a base using bamboo (purchased from the dollar store) and plasticine. Then, they stretched their tipi around the base, and used a hot glue gun to attach it.


Next came the really fun part - decorating their tipis with absolutely anything we could find in the class! Students used anything - paint, shells, rocks, yellow powdered tempera paint, fabric, plasticine, wire, etc. As with last time, this project was a HUGE success!!


They're just so beautiful. I'll be posting soon about our next First Nations project - wampum belts!! Can't wait!

Tuesday, June 5, 2012

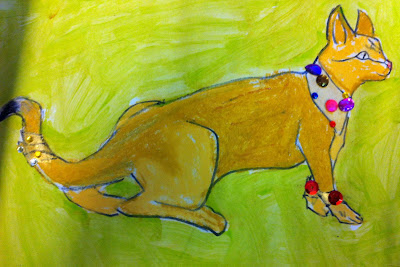
Ancient Egyptian cats - grade 5


This was a fun drawing lesson I did with a group of grade 5's studying Ancient Egpyt. We did a group draw on construction paper, and students colored them in with pastels. They used tempera paint to fill in the space around the cats. Students were then allowed to use jewels to decorate their cats, making them look rich and regal.

What I love most about this project is the creativity of the students. I know some art educators aren't wild about the group draw, but as someone who struggled in art class as a child, group draws are a favorite of mine. I have never been good at drawing, and always felt like I was not a good artist because of this. I've dedicated myself to never having my students feel this way. I always start lessons with a loose guided draw, but let students know that they can change anything they want about it, and if they want to go off on their own, they can go nuts (as long as they don't need my help!)

Below are some examples of students that used the guided draw. Their results are fantastic, and likely a lot more purposeful than they would have been had they just sat down and tried to draw a cat. Above and far below are examples of students who decided to go off on their own. They used inspiration from the unit that we were studying, and used elements of our guided draw to make their own cats.

I love the way all of the different Egyptian cats turned out!


Wednesday, May 23, 2012

Chinese dragons - grade 4/5

In grade 5, students learn about ancient civilizations. Since the grade 4/5 class was currently learning about ancient China, I decided to come up with a lesson where they would draw big, beautiful, coloring Chinese dragons!

We did a little lesson about the significance of dragons in ancient China, and then began our drawing. Drawings were done on construction paper, and colored in using oil pastels. Students had total freedom when it came to colors and details. When they were done, they used a Chinese alphabet I had printed off the internet to create their names in Chinese characters. This activity took between 2 and 3 periods to complete.

I found this wonderful how to at this site, which I have pasted below. This helped me a lot, and outlines the basic steps that I used when showing the kids how to draw the dragon.


Here's a few more finished drawings!


Related Posts Plugin for WordPress, Blogger...