Showing posts with label Optical illusion. Show all posts

Sunday, November 3, 2013

Stacked Square Optical Illusion - grade 6

This is a project I absolutely love - it always produces great results, it's fairly simple for students to follow, and it's a great lesson for shading and creating a 3D drawing!

I'm not sure what to call this illusion - I've seen it a few times, but there's never really been a name associated with it. to me it looks like stacked squares... soo.. stacked square illusion?


Here's how to do the stacked square illusion:

                       
I begin by giving my students a template that I've made with three lines, as you can see in the first picture. I like to give them a starting point, because students can get really caught up in drawing the lines straight or the perfect dimensions apart. Instead of having them use the side with the lines, I have them work from the backside of the paper, so they can faintly see the three lines through the paper, but they aren't actually a part of their final project. (I hope this makes sense.)

The first thing students do is connect the lines at the top and the bottom of the pate, and identify roughly where they thing the center of the shape is.

The next thing they do is start drawing pairs of lines. If the pairs are above the center mark they drew, they point them upwards (if possible, I have them point the lines more gradually upwards as they go.) The other thing they must do is close the sides of their pairs of lines (since they're working from the backside of the paper, they won't actually have the three dark black lines that we began with, they'll just be seeing them from the other side of the sheet.)

This is what they should have once they've worked up one side of the paper. Once they're at this point, they can flip their paper upside down, and do the same thing on the other side.

This is the part that really makes the illusion stand out - under each set of two lines, they draw two nearly horizontal lines going towards the center of the shape. They must do it all for one side of the paper, then flip it upside down and do it for the other side.

Once this is all done, they can begin to color! They need to choose a side that will be dark, and a side that will be light. To keep it simple, I have them pick a marker and a pencil crayon in the same color. The parts in between the colored sections is shaded in using a pencil - dark shading on the dark side, and lighter shading on the light side.

Once they've finished the illusion, I have them color in the background using Sharpie. They all turned out so, so well - I'd love to post them all!


Tuesday, July 9, 2013

1 point perspective optical illusion on collage background

Well it's sure been a long time since I've updated - this is mostly due to the fact that my summer camp is in full swing, so I just haven't had time to get on the computer! Days are spent 100% with the kids (no lunch or recesses by myself anymore!) and after camp is when I plan, prep, and rest! Camp has been running for a week and 2 days, and so far, I'm having a wonderful time. It's been all I was hoping for. I can't wait to write more about it, but for today, I am just dying to share a project!


This is the first project I do for the week with my camp groups. The week one projects were just as fantastic, but my camera was dead so I missed getting photos. I found the idea here, and even though it was done by high school students, I knew it would adapt well for my art camp kids (grades 3-8!)

Students started by making a collage with the "color story" of their choice onto a piece of foam core. It's really interesting to watch them choose colors - some have trouble going off the grid, but I try to keep reminding them that it's a color story, it doesn't have to be ALL one color (so if they chose orange, they can use yellows and reds - but in the end, the overall message should be orange.)

The next day, they do basic one point perspective drawings using a variety of shapes, onto a separate paper.  The shapes are colored in with gold Sharpie, and the lines are colored in using colors that match their color story.

I think they're just beeeauuutiful!!


Friday, September 14, 2012

Optical illusion cube - tutorial

Here is an attempt at a tutorial for my optical illusion cube!


This is a pretty complicated lesson, and requires a lot of attention to angles and parallel lines. I did this with grade 5 and 6, and they found it pretty confusing, but were definitely able to work their way through it and finish it in about 2 or 2.5 hours. A ruler is a MUST!

To start, I gave my students a template for the outside. I did this because I thought the project would be near impossible if they started with a blank sheet. All of the sizes would be different, the angles likely wouldn't be right. It gave them the start they needed to succeed. I've uploaded the template for you guys here. Let me know if you have trouble downloading it!

Here's my attempt at explaining this complicated project on the computer. Let's see how many times I use the words line, cube and parallel. 

 Students will start by making the outside lines that frame the cube. This part isn't too difficult. They need to use a ruler first to give them a guide as to how far down to draw their parallel lines. I referred to this as an imagined line, meaning they didn't draw it or trace it, but they used a ruler to make themselves aware of where the parallel lines would meet.


They essentially do this all around the template, to close in the part where the cube will go. This entire process took about 20 minutes, and I modeled it explicitly on our document camera, drawing with them as we went.


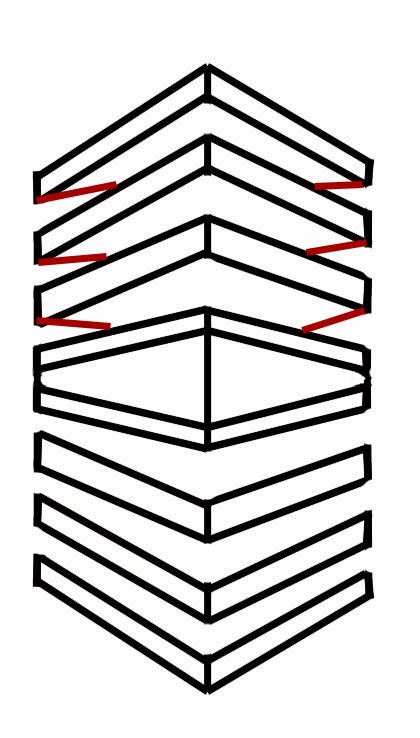
This is where the fun starts. Making sure that the template is positioned as shown (with one of the three template lines facing the top) students will start to create their 3D cube. Start with the line that's in blue, going approximately halfway up the space left within your lines. Then, they connect the red lines, eyeballing it to make sure that it's all even. I told my students to make sure that they had created three equal square shapes. This took some of them a few tries, erasing as they went. Even in the photo I made here, I can see the squares aren't exact, but they'll still work.


Next, they need to create a 3x3 grid on their cube, making sure that the lines from one side connect into the lines of the other side. They also need to make sure that their cube lines are parallel to the lines they created at the beginning of this project, and the lines in their cube... (is this making sense?!)


Now they need to start on the grid outside. I colored the template lines in yellow, to show that the lines they are pulling up from the cube need to be parallel to the lines on the template. They should have six lines going up, and six to each side, plus the line that already existed in the template. The lines should meet up with the lines they drew in the cube.


Now they're going to add two long lines going down and across to each section. These lines sort of need to be eyeballed as well, just making sure that they are creating squares that appear equal to the squares they made in their cube. My drawing is pretty off, but it would still work if a student was that imprecise with their lines. It just needs to work in general, it doesn't have to be perfect.


Once they are done that part, they get to begin the coloring. This is the fun part. Most of my students chose to do a two color scheme, but some decided to have a rubix cube in the middle and more muted colors on the outside.

We talked about how hard to push with your pencil crayons - I made a scale on the board, and showed a 10, a 7 and a 5. The two dark sections should be colored as a 10, pushing as hard as they can. The two mid toned sections should be colored as a 7, pushing but not too hard. The white sections should be colored as a 4, not pushing very hard at all on the pencil crayon.


Following this, I had them cut their cubes out, and glue them on their choice of colored cardstock. They really look amazing all together!


Just make sure when you try it that you are constantly circling the room, helping them to catch their mistakes before they get too far. I had a few kids that ended up doing total redos, as they made little mistakes that I didn't catch (such as drawing the cube in while the template was upside down - doesn't seem like a big deal, but it ruins the whole picture!)

Please let me know if you try this, I'd love to see your results!

Friday, September 7, 2012

Optical Illusions - grade 5/6


Today I did an optical illusion lesson with my grade 5/6 homeroom class. Since I have them for the majority of the day, I am able to spend a nice chunk of time on art. They were able to complete the entire lesson in about 2 hours. Let it be known that this was a HARD lesson for them to do! It involved a solid hour of instruction, which I did step by step to make sure that they understood. Following that, we did a lesson on shading, including making a scale of how hard to push with your pencil (from 1-10, one section was a 3, one was a 7, one was a full on 10.)

If people are interested, I can do a tutorial for this lesson. Just let me know in the comments if you're interested!


 Below is a hastily taken picture of the bulletin board:

Hope back to school has been great for everyone!

Tuesday, May 22, 2012

Optical Illusions - grade 5/6


Here's an optical illusion lesson that I did with my grade 5/6 class. I saw this art lesson on the walls of a school when I was voting last year, but I know that it's one that is often done by art teachers. It took me a while to figure it out, so I made some step by steps to make it easier on anyone who wants to try it!

To do the background, just follow the steps to the left. When doing this with a class, I often use terminology like "bumps in" and "bumps out". This is how to do it without the circles. If you want to add in the circles, just do them right after step four, before coloring in your sections in black.

Below are the steps to do the circle (just ignore the grid in the background, I modified these instructions from the how-to I did here):


 Then, they color it in, using a checkerboard style pattern. The parts in grey below should be colored in black. The other sections should be done gradient style using colored pencils.
Hopefully this all makes sense. Here are some of the finished projects!

Thursday, February 16, 2012

Valentine's day Op-h-Art Optical Illusions - grade 2/3


Using a technique I tried a while back, I came up with an idea to do a Valentine's day inspired op-art project.

I made this template for the students to use, because I did this project with... wait for it... grades TWO AND THREE!! I was dying to try this project this week but my 6th graders didn't  finish their other work in time, so I decided to do it with a grade 2/3 class. I gave them the template with the few hearts drawn on it VERY lightly, just so they wouldn't make things too hard on themselves by drawing the hearts too thin or too close together.

Here's the steps to complete the project.
Start by drawing lines going up to the heart:

Then draw the lines on the other side. It really actually isn't that important if they match up (especially if you are doing it with younger kids.) In the end, it doesn't really change the effect. 
 When you have finished the lines all around the exterior, start filling in the heart (or whatever other shape or idea you have!) Instead of drawing them straight, they are to be drawn with a slight upwards bump.
 As you get to the longer sections, don't make an arc the entire way. Just bump up on the sides, and go straight through the center.
 Finish up, stand back about 2 feet, and you should have a great looking optical illusion! It looks even better if you lightly shade inside the heart with pencil crayons.
And now.. onto some of the ones completed by the second and third graders! (!!!)


 Also.. one of my 6th grade boys who finished his work early had a chance to make this, and it's really  the cutest thing ever.

Love is in the air!

Before I go, I want to say a HUGE thank you to another blog I adore, Smart Art for Kids, who gave me a shout out and as a result, several new followers. I really love the art blogging community, and I appreciate so much that people are willing to share their followers with me. Make sure to check her blog out!
Related Posts Plugin for WordPress, Blogger...