Showing posts with label home. Show all posts

Thursday, March 2, 2017

Unicorn Birthday Party part one - Nutella buttercream unicorn cake


Being a mom hurtles you through time at a speed that is impossible to put into words. Here I sit, writing a blog post about my now three year old's birthday party. How did this happen!?

Juliet made it clear in no uncertain terms that she wanted a unicorn party. I actually tried many times to change her mind to a Teddy Bear Picnic party (so cute right?! She said no. So guess what her sister's birthday theme will be!)

Luckily for Juliet, unicorns are pretty trendy right now. There was no shortage of unicorn ideas on the internet to get our creative juices flowing. I'll break down a few of my favorite unicorn ideas we used for her party over the next few days.

First, the cake.

Unicorn cakes are everywhere. These cakes look daunting, but are actually extremely easy to make.With a few simple tricks I promise you, you can make a great looking unicorn cake too!

Unicorn cakes need to be tall. This means several layers of cake, so invite all of your neighbors over when you attempt one. I tried to find 7" baking pans to keep the size smaller, but I swear they don't exist anywhere. I found a 6" but it was way too small. I ended up using an 8" pan which was fine, but it still took 3 boxes of cake mix to get the cake tall enough (5 layers.)

Before baking the layers, I separated the mix into 4 bowls and dyed three of them (pink, blue and purple). I swirled the colors together with the white mix, to get a cute marbled effect that I of course forgot to take pictures of upon cutting the cake. 

Have you ever built a layered cake before? If not, the main trick is to let your cakes cool completely, then slice the tops off flat so they don't make a dome when they are stacked. That being said, I am in no way qualified to explain this whole process to you. Google is your friend. 


Aren't the swirls pretty?! It looked even cuter when the cake was cut. 

In between each later I slathered on buttercream, then when the cake was fully built, I did a crumb coat. 


Let's talk about the icing for a second - Nutella buttercream. Can you even?! It was so good. And SO easy if you're into being lazy. Here's how to make it:
  • drive to bulk barn
  • buy a container of buttercream
  • drive home
  • using a hand mixer, mix in a big scoop of nutella
  • taste it. If it needs more Nutella, add more. 
Guys. SO good.

After the crumb coat sits for 30 minutes, slather on more icing until the cake is smooth. 

Now all that's left to do is make a horn and ears, and add in some flowers. Some fancy people make flowers using icing or fondant, but I just grabbed a bunch from Dollarama and stuck them in. #win

The horn was made using fondant. It's a skewer with two snakes of fondant wrapped around it. When making the snakes, have them get skinnier on one end. Then the skinny ends will become the top of the horn!

The ears were fondant rolled flat then cut into triangle ear shapes. The pink inner ear was attached to the white outer ear using a dab of water, and stuck into the cake using skewers. Once you've stuck in the horn and ears, use an icing pen to draw on some eyes, and you're done!


My daughter LOVED the cake. I kind of can't believe how simple it was to make, especially since the payoff was so great. If you're on the fence about making one, I really recommend giving it a shot. And if you find a 6" pan anywhere, hit a girl up, because this cake was huge.

I'll be back soon with more of the unicorn projects we did for her party!

Have you tried this project? If so, let me know in the comments!

Friday, February 14, 2014

Simple bathroom makeover - for around $100!


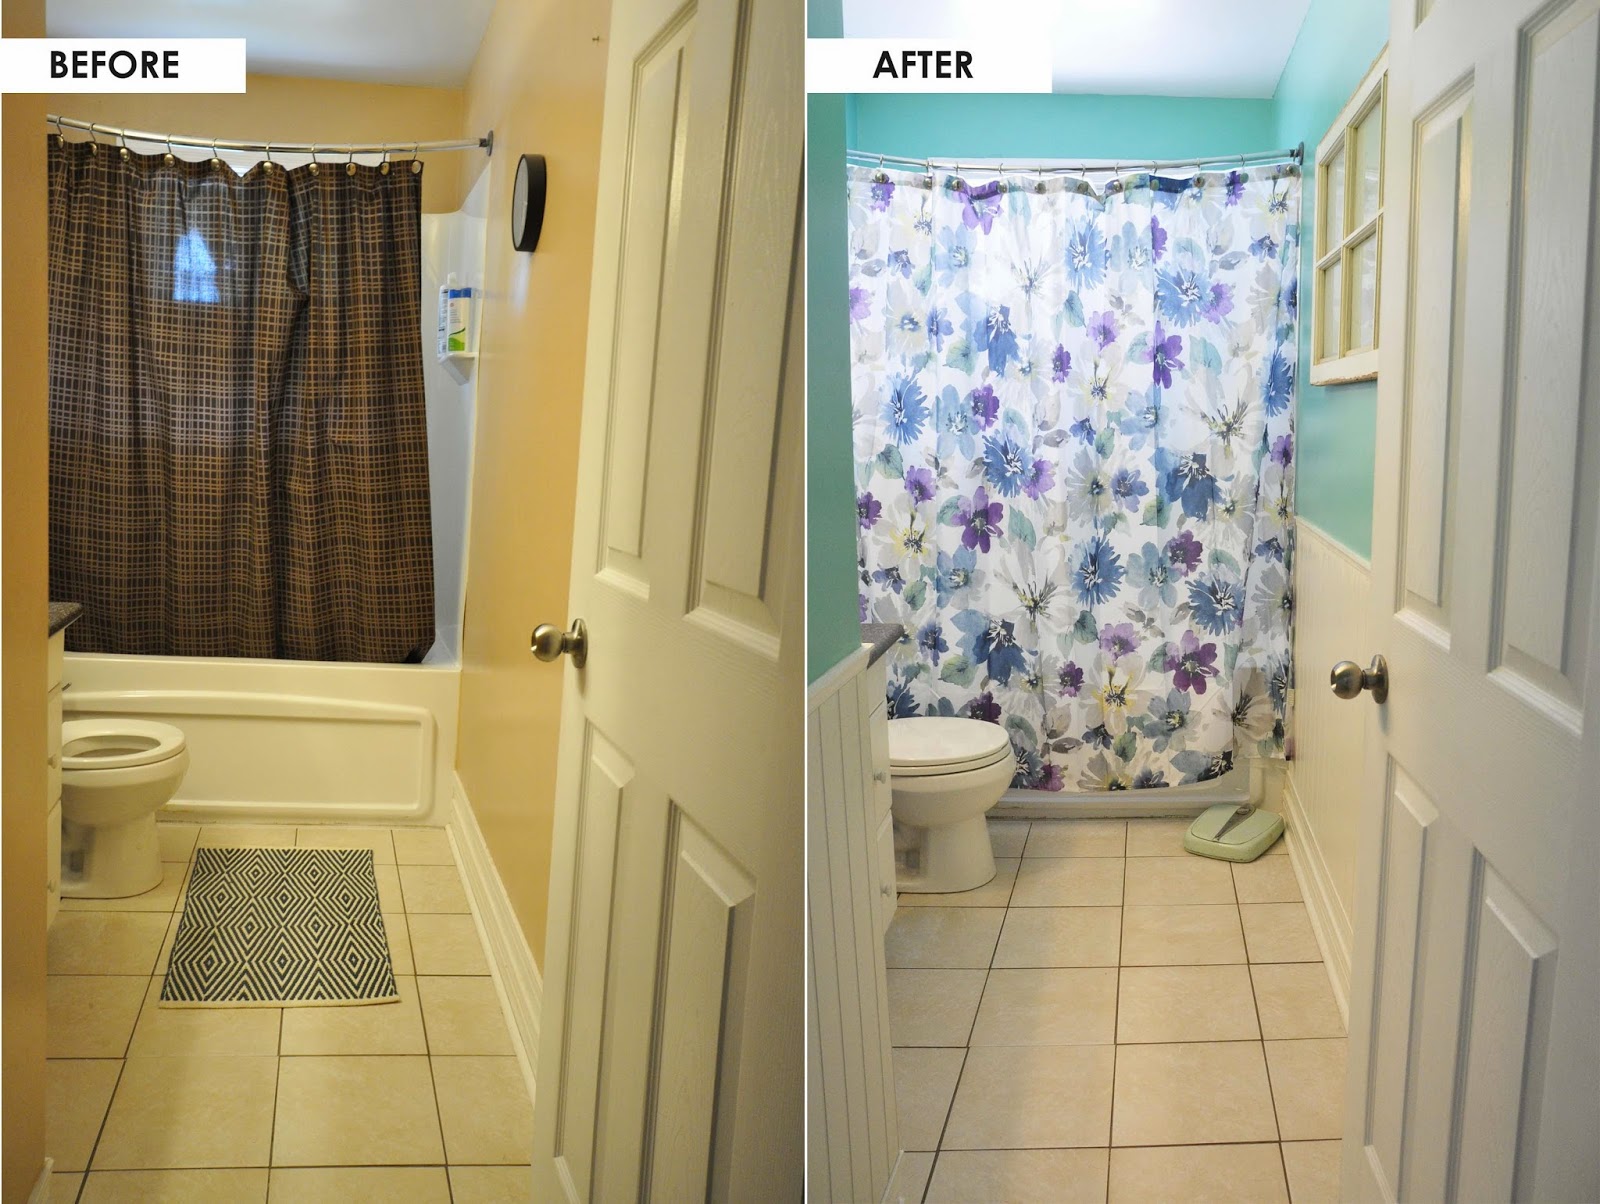
Our main floor bathroom was a hideous disaster that I'm surprised we tolerated for as long as we did.We went a good 7 or 8 months living with the "before" bathroom, which I actively hated, before I took this renovation on in the summer. Had I known the makeover would have been so simple and inexpensive, I would have done it the week we moved in.

The previous owners had the bathroom decorated like this, and I would actually argue it was better than what we did when we first moved in. At least their shower curtain had a bit of life in it.


We moved in, used an old shower curtain from who knows when, changed out the toilet seat. and called it a day. But, like I said, months of seeing that dank, dark bathroom finally got to me, and for only about a hundred dollars, we were able to transform the bathroom into a much more beautiful space!


The first thing I did in the bathroom was repaint. A while back I scored an amazing deal on paint (25 cans for a buck a piece, that I could come back and retint whenever I wanted) so I brought in two cans and got one tinted in a nice teal color, and a second one tinted in an antique white (to paint the wainscoting.)It took a couple of coats to cover that awful beige, but I was so happy to see it gone.

The wainscoting made the biggest difference in the room. Since the bathroom isn't very big, it cost really little to do. I can't find the exact product we used online, but at Lowe's, we found a big sheet of wainscoting that, when cut in half, gave us the perfect height for what we wanted in the bathroom. Each sheet cost $35, and two sheets was enough to do the entire bathroom. In the interest of keeping it really easy, I had the sheets cut in half at Lowe's, so that we would only have to do minor cuts to fit it in the bathroom.

The installation was super simple, and I ended up doing most of it myself. I placed it over the previously existing baseboards (which were double height for some reason, but I actually really like the way it looks.) I used a nail gun to put the pieces in place, and then topped them off with a piece of chair rail. I then painted the entire bottom portion in the antique white color (baseboards included.)


The last thing I had to do was find the perfect shower curtain, and find a few decorations to spruce things up. It actually took a couple of months for me to find a shower curtain, but I finally came across one at Home Outfitters for about $20 (it was on sale half price) that fit the room perfectly.

Joel's parents had a great old scale they were getting rid of that they gave to me, which matched the walls really well. The old window I got for $5 at a garage sale a few years ago, and I've just been waiting for a spot to put it (it used to be hung here in our kitchen, but we since put in a real window!)


There are many things I'd do if money weren't an issue - I'd love to change the flooring (can you believe that's actually the color of the grout? It's not just dirty!) to something much darker. Maybe a dark, wood look ceramic tile.

If I had the money, I'd also change the vanity to something much cuter - probably to something simple and modern, still white cabinets with a darker counter top. And while I'm dreaming, I would throw in a claw foot tub instead of the standard builder tub that's there right now. But for now, I'm content to live with our inexpensively made over bathroom!


Thursday, August 25, 2011

Homemade pocket chart!

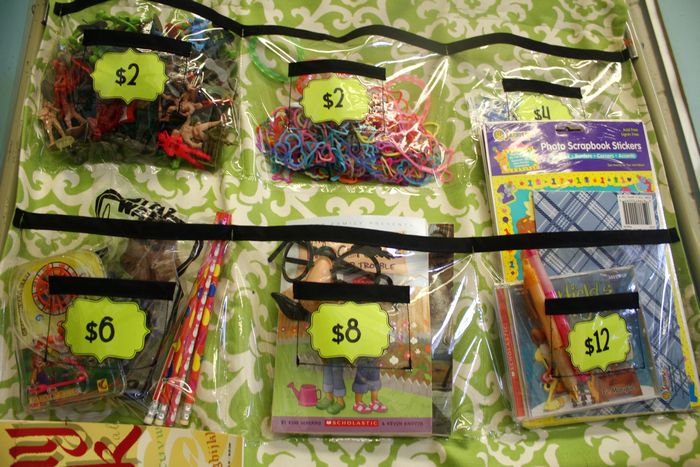
Yesterday I took on the task of making my first ever pocket chart. I use a pocket chart in my class as the class store, but it's pretty hideous and I really don't like the blockey colors.

First, I started by purchasing .75 meters of this fabric ($2.50) and 1 meter of vinyl ($3).
I ironed about an inch and a half around the edges, and flipped itover a second time, to get a crisp edge without having to do too much sewing:Then, I took the vinyl, and cut out four strips,that were the length of the fabric and about 7 inches tall. When it was all cut, I laid it out on the fabric to eyeball everything (very hard to see!) Next, I cut out some small vinyl pieces to act as little slots to place tags. After everything was cut, I pinned on tape binding to all of the edges.
This is what it looked like once the vinyl pouches were sewn onto the pockets.Sewing the vinyl to the fabric was a bit of a task. It's difficult to sew because the vinyl tends to get caught on the presser foot of the sewing machine. Finally, I ended up pinning paper towel to the top of all of the vinyl, so that it would slide easily. It just took forever, but really made the process so much easier. When I was done the sewing, I just ripped the paper towel out. It came out quite easily.
And, that was really it! I just had to sew, sew, sew, all along the corners and edges until I had pockets (basically wherever you see paper towel in the picture.) I'm really happy with how it turned
This is what it looks like stocked! (there's still some goodies missing from the more "expensive" pockets.. not sure what to put in those, yet!)
The entire thing cost under ten dollars. I will definitely be making more!

Saturday, August 13, 2011

My new lamp!

Today I completed my project of turning this
into thisWhen we were on vacation in Maine a few weeks ago, I saw this amazing lamp at an antique store that was worth the effort of hauling home on the 9 hour car trip. I paid $20 for it.
The thing I liked most about it was the eagle on the lamp base:The first thing I did was trace the lampshade onto bristol board and cut off the old lamp shade (it was garbage bag material, just wound around the wire!)

I decided to cover it using an idea I had seen on mama-says-sew, which was for a nice, ruffly lampshade. I bought a rough, almost burlap-like fabric to cover the bristol board with.

First, I cut it into strips:
Then I ironed them down the center so that there would be less hangy threads (without having to do any sewing).
and I was left with this:

Then came the VERY long process of gluing the little strips onto the bristol board!

Basically I would just put glue either on the board or on the piece, and desperately try to get it glued on nicely before it dried or I burnt myself.
As a result, there are some big clumps of glue hidden nicely under the fabric. My fingers are also quite burnt.This took several hours to finish, and got really boring after a while! I definitely had to split it up into several sessions to save my sanity (and my fingers.)

Next, I took the lamp outside and got to spraypainting:
Thennnn all I had to do was put the lampshade on and:
Very happy with this little guy!

Thursday, August 4, 2011

The great chair makeover!

This past week, Joel's mom Shirley gave me a wonderful old chair that used to be her fathers. With it, she also gave me permission to give it a makeover! I could just feel Joel's excitement when I took it home.
Cute, no? I love the detail on the bottom.

Something had happened to the finish, since it had been stored in an attic for the past several years.

The first thing I started off by doing was removing these little pins that are all around the chair. I wanted to peek under the fabric to see if the cushions were still in acceptable condition. They aren't really, but that's no big deal - I can just cover what's there now with the new fabric, and then put the pins back in.

Here's all the little buttons. I moved on to removing the finish on the chair. This took the better part of my afternoon, since it's just so hot and it has to be done outside.

Can you see a difference? A LOT of gunk came off!

After I was finished stripping it, I had the big test: How many coats of paint would this thing need?
Based on the test spot, definitely more than one, probably 3. Sigh.
Coat number one!
This was coat number... three I think? It needed more.
In the end, I did about 4 coats, plus I did a coat of spray paint afterward just to fill in all of the cracks.

So next part is the best part: covering the chair!! This is the part that really makes the difference.
I was debating between these two fabricsbut then I saw this one and it was perfect.
So then it was just a matter of covering it!
Taking flattering pictures of a chair at 10pm is not an easy task, but you get the gist of it.
It took a surprisingly long time to cover it, and there's still a few finishing touches I'd like to do this week on it to cover some seams. I also haven't been able to get those little pins back into it - Joel and I both tried, and they just won't go back in. Joel thinks I should try and scrape the paint up to give it an antiqued look, which would probably look really good! If I do end up doing that, I'll make sure to post some pictures.
Related Posts Plugin for WordPress, Blogger...