Showing posts with label sharpie. Show all posts

Tuesday, October 22, 2013

Day of the dead skulls - grade 6


This is a repeat of a project I posted about two years ago. It's one of my all time favorite projects, because it's so visually stimulating, and kids love it!

I use the same process every time I do this project - students are given a blank skull template (because drawing a skull isn't the objective here - it's actually to create a symmetrical piece of art based on a cultural celebration.) We talk about Dia de los Muertos, and look at images of skulls from various celebrations. Then, students draw designs in the skull using a pencil, paying attention to symmetry.

When they're happy with their designs, they trace their lines in Sharpie, and use watercolor paint to paint them in. Once they're done, they cut out their skull and glue it to a piece of scrapbooking paper. Lastly, they use jewels and sparkles to add finishing touches to their skulls.


Students learn a lot about balance in this project - there is really a perfect balance that needs to be achieved between black, white, and color, and its interesting to see how they pick up on this while they're working. The package of scrapbooking paper that I bought had some pieces that were grey on black instead of white on black, and you could see when students held their skull up to those sheets that it didn't give the same kind of "look" as when they used a busy, patterned, black and white paper.


Students also picked up on the need for balance in their skull - keeping a good mix of white with their painted parts (it can be tempting to paint the whole thing, but the white adds so much!)


Since holiday related projects aren't for everyone, I always have an alternative option for students - in this case, a vase, which still lends itself to the symmetry and design, without being holiday related. All students were allowed to pick if they wanted to work with a skull or a vase.

 Look at this amazing vase one of my students came up with - it's stunning!


It's so beautiful that I feel inspired to do a whole project based around it. I love when that happens!

Monday, September 2, 2013

Antique treasure maps - grades 4-8

Ok I am being worse than usual at updating! Summer has just been toooo appealing - we've been working like crazy on the house, and I have been busily getting ready to teach a new grade, in a new division, at a new school!

This is probably my favorite project that we did during my Summer art camp. I actually just came up with it while we were at the park one day, as the kids were playing in the sand, digging and hiding treasure. I asked if they wanted to try drawing treasure maps, and they were all really excited!


To create the maps, I first had my students research antique treasure maps. They looked at a variety of compasses, and decided on the style they wanted. They sectioned out islands, which they outlined using Sharpie, and then colored the edges using pencil to make them stand out more. The next step was details - students used thin Sharpie to add mountains, trees, monsters, pretty much anything they wanted! When everyone was finished, we used brown liquid watercolor to dye the paper brown. The next day, my camp volunteers helped to burn the edges of the paper, giving them an aged look.


They were soo proud of these, and I don't blame them - I LOVE them!!

This last one was done by a student of mine that is just such a talented artist. She had to leave before we got around to burning the edges, but the finished product is still beautiful. I'd hang this on my wall!

 Tomorrow is my first day at my new school - wish me luck!!

Thursday, June 6, 2013

The world's best grade 6 grad portraits!


These are my FAVORITE!! For grade 6 grad, our school always does some kind of self portrait project with the students. Last year, we did pop art style self portraits. This year, using an idea I adapted from The Lost Sock Blog, students made avatars on www.faceyourmanga.com, which they printed and used as references to draw their portraits onto cardboard.


Just to give some perspective on how big they are:

Here's a quick summary of the way we did it:
  • design an avatar using faceyourmanga.com, and print it out
  • draw the avatar onto cardboard, using pencil
  • trace all pencil in Sharpie (this is a must - even though it will get covered in paint, you need to have dark lines to see them again after you've painted on them!)
  • paint with tempera paint (use acrylic for whites and light colors so that they show up well!)
  • wait until paint is dry, then retrace your Sharpie lines
  • use chalk pastel to add detail (cheek color, highlights in hair, shading around nose and chin, etc.)
  • cut out using Exacto knife

Voila!


I just love them. Cardboard was an amazing surface to work on - it soaks up the paint beautifully and gives rich, inspiring color. I love them!

Three more weeks left of school! Many changes ahead, I can't wait to share them all here!!

Friday, April 5, 2013

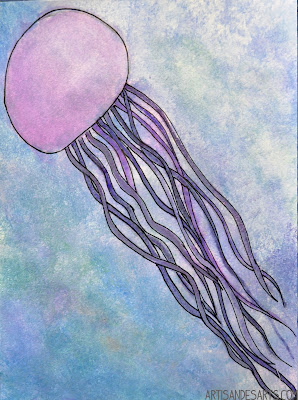
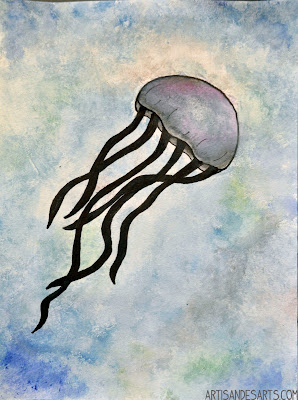
Floating jellyfish - grade 5/6


Here it is - my monthly new favorite project. Every month or so, I seem to declare a new project my favorite (see: here and here, and several other times I've said this.) But really, this one is special. In November, one of my students did a project on jellyfish, and I've just had it in my head that that would be a neat thing to do for an art project. Even more recently, someone pinned a photo of a jellyfish, and it jogged my memory.

Coming up with this project was pretty simple - I googled images of jellyfish, figured out how to draw them (very simple - start with the bubble shape at the top, add the tentacles, then behind the tentacles draw the line that represents the other side of the jellyfish.)

Students first drew in pencil, then traced in Sharpie (some thin, some thick.) Then, they used the same stippling technique that we used for our elephants and hot air balloons project. I encouraged students to use a mix of blues, soft purples, and blacks to create their background. Next, they moved onto their jellyfish, where they used greys and purples to create a shaded effect that made their jellyfish look rounded. The last thing they did was color in the tentacles using black Sharpie.


I think they are absolutely fabulous!! I even hung up my example in my hallway at home:


Sunday, March 24, 2013

Canvas Tipis - grade 6


For the past two years, my homeroom class has been a grade 5/6 class. That means a lot of my grade 6's this year were actually my grade 5's last year. I did this project last year with the grade 6's, and this year, the new grade 6's were so excited to get their chance to do it!

Part of our social studies curriculum for grade six is First Nations Peoples and European Explorers, which is pretty much the best unit possible for art projects. Our first big project, after studying First Nation's habitats, was to make tipis.

I have a go-to tipi template, which can be found here. Students each get a copy of a tipi template, and then we spend some time in the computer lab, where they research First Nations symbols. Students are given about a hour to draw out their plans, focusing on symmetry, placement of symbols and color choice.

Once they have finished their rough draft, they are given piece of thick canvas material (I bought this canvas at an estate sale for probably under a dollar, and it was enough material for two years of tipis!) They tape their paper tipi template to their canvas, and cut it out.

Students then used Sharpie and acrylic paint to recreate their designs onto the canvas. Black Sharpie is used to make the base of their designs, then colored Sharpies are used for the small details. Larger details are filled in using acrylic paint. The paint thickens up the canvas, making it really sturdy - perfect for their tipis!

I had a donation of old binders, which I cut apart and we used for the base of their tipis. On top of the binder, students built a base using bamboo (purchased from the dollar store) and plasticine. Then, they stretched their tipi around the base, and used a hot glue gun to attach it.


Next came the really fun part - decorating their tipis with absolutely anything we could find in the class! Students used anything - paint, shells, rocks, yellow powdered tempera paint, fabric, plasticine, wire, etc. As with last time, this project was a HUGE success!!


They're just so beautiful. I'll be posting soon about our next First Nations project - wampum belts!! Can't wait!

Sunday, March 17, 2013

Chinese Lion Dancers - grade 4/5


This is a project that I did with my grade 4/5 class. We began the project back in January, if you can believe it, and it took four or five class periods for them to finish (much longer than I had anticipated!) We just had an unfortunate run of interruptions during our art block that made this project take so much longer than I would have guessed.

I originally saw this project on SmartClass. She has great directions for how to draw the lion, so I would encourage you to check them out!

With me, students drew in Sharpie, and then added fireworks using pastels during the first class. The next three classes were painting - students used watercolors for most of the painting, then used gold and silver tempera paint to add in details. They turned out beautifully!


Our March break is ending, back tomorrow after a week off. Yikes! Better start planning!
Related Posts Plugin for WordPress, Blogger...