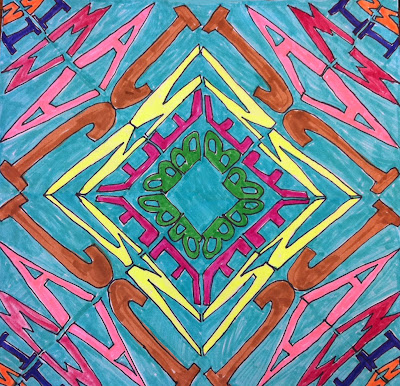
Here's a great lesson that I saw over on teach kids art. It's quite simple, very relaxing, and would be great to leave with a supply teacher (I left explicit directions below, which could be printed up and handed to a supply!) I love how my kids did with this one! It took probably 2 hour long periods.
Here's the step by step. Use an 8 1/2 x 11 paper, and fold it into a square:
Each kid will need one of these folded papers for themselves as well (do the same thing as the first two steps)
Using the triangles from earlier, they will make their tracers:
Then,decide what letter will be in the middle, and trace the name (use pencil first) flipping the triangle over as you go to make sure the same letter is in the center.
Then, color it all in!


Ooooooooooooooooh, too cool! I'm going to link to this over on my sub blog right now. Thanks!
ReplyDeletejan www.subartlessons.blogspot.com
Good idea! I've done this with oil pastels before, and rubbed to transfer it, but this is way less messy!!
ReplyDeletewoohoo! I was searching for an art idea that used their names for the display in the first week back at school- this is PERFECT!!! Art is not my strength so I need all the help I can get. Thanks from Annie in Australia.
ReplyDeleteThat's wonderful - Let me know how it goes!!
DeleteIt was brilliant thank you and the idea was used by 3 other teachers who saw them on our wall- my students worked as peer tutors to teach them. Thanks again- off to trawl your site for another idea now :-)Annie
Deletelove love love everything i've seen on your posts so far! teaching middle level art so ideas to keep the projects fresh and exciting are always welcome! thanks and keep posting! :)
ReplyDeleteI must have to take your blog as my primary blog for reading as there are so many new things to getting more and more true information.
ReplyDeletename-art
The design looks better when you have all the letters touching or leaning up against each other. Also, I let my students turn their letters in all directions: sideways, upside down, etc. At the end, when transferring to the large square I have them put an "x" at one end of the fold line of the small square and an "x" in all for corners of the the large square. Then all they have to do is match up the x's and trace. It also helps to make sure they keep their design turned the correct way and their final is not folded.
ReplyDeleteperfekt günstig uhren, combining elegant style and cutting-edge technology, a variety of styles of perfekt günstig omega uhren, the pointer walks between your exclusive taste style.
ReplyDeleteMy tushy
ReplyDeleteBruh
DeleteSup
ReplyDeleteBruh Idc
ReplyDeleteWhat the heck is ButtCheek?
ReplyDeleteMe
ReplyDeleteAhh!!
ReplyDelete